30 Jan Multiple Outputs Dynamic Routing in Ableton Live
Laptops have become a familiar site on stages in clubs and venues all over the world. With the laptops came a new generation of nifty outboard effects, designed to apply big effects in a fast and intuitive fashion. The most common way to use this kind of equipment is to simply chain it between the laptop and the PA, but with a little creative routing you can get much more control out of the same set-up.
Note: In this tutorial I’ll be using Ableton Live 7, a sound-card with at least 4 mono outs an 2 mono ins and an external effect with 2 mono ins and 2 mono outs.
Step 1
Connect the sound-card’s audio outputs 1-2 (left-right) to your monitors (as they normally are)
Connect your external effect to your sound card with 3 connections:
– the sound-card’s audio outputs 3-4 (left-right) to the the inputs of your external effect
– the sound-card’s audio inputs 1-2 (left-right) to the outputs of your external effect
– the sound-card’s MIDI output to the MIDI input of your external effect (this connection is optional)
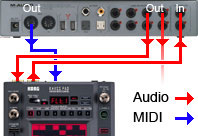
In the picture I’m using a M-Audio Firewire 410 and a Korg Kaosspad 3, but any soundcard with 2 stereo outs and one stereo in combined with basically any kind of external effect equipment will do.
Step 2
Configure your sound-card so that it will monitor its inputs 1-2 directly to its outputs 1-2. The sound-card will now put the input signal directly on your speakers.
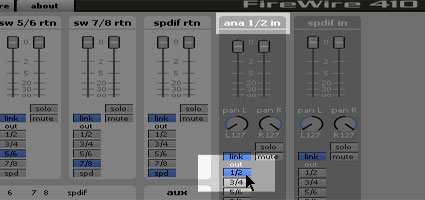
This option might be hard to track down, but it should be available in any decent sound-card’s settings. You can also use your operating system’s sound settings in order to enable this feature, but it is preferred to adjust the settings in the sound-card’s own menu.
Step 3
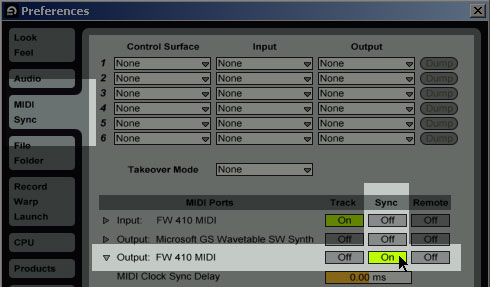
In Ableton Live’s Preferences, enable the MIDI-Clock sync output on the MIDI port which is connected to your external effect. Getting the external effect to sync to your sequencer is optional, but if the effect uses delays or LFO’s it is much preferred to have the sequencer’s MIDI-Clock determining it’s tempo.
Make sure your external effect is set to receive a MIDI-Clock sync signal. If your effect uses a clock signal and it has a midi-input, this should be fairly easy to change. If you are having problems, check the manual that came with the effect for “external MIDI sync”.
On the Koasspad this setting is changed by first pressing SHIFT + 4 [MIDI FILTER]:
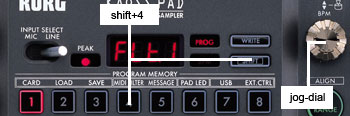
Then, rotate the jog-dial [BPM] to select CLOC. Press the jog-dial in order to choose to edit this function. Rotate the jog-dail again so that setting EXT is blinking. Press WRITE to save the setting.
Step 4
Now that all equipment is connected, we need to make some changes to the Ableton arrangement. In this Tut I will be using a new arrangement, but this routing table can just as well be applied to an existing arrangement.
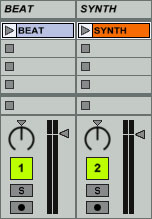
Create two audio tracks, each containing a loop from your arrangement. At first it’s best to use loops which only contain one instrument, this way it will be clear to hear what you are doing. I have used a BEAT and a SYNTH loop, which can be easily held apart.
Step 5
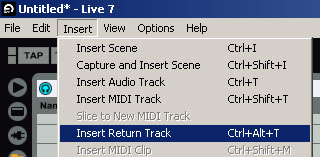
If they don’t exist already, create two Return Tracks by pressing Ctrl+Alt+T. I have named mine OUTPUT 1-2 and OUTPUT 3-4, to avoid confusion.
Step 6
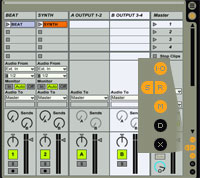
In order to see all possible routing options, you will need to enable the Routing and Sends menu at the lower right corner of your arrangement. Make sure the buttons marked I-O, S and R are marked.
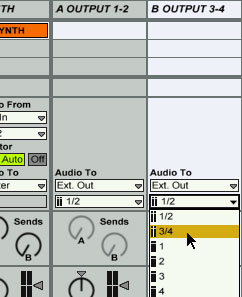
Set the output of both Return Tracks you have created in step 5 to Ext. Out.
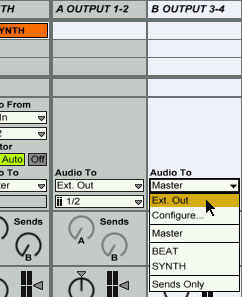
Set the output channel of the second return track, in this case B OUTPUT 3-4, to 3-4.
Step 7
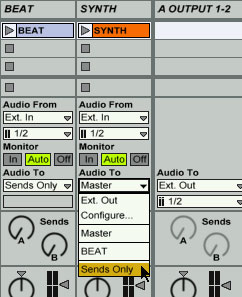
Set the Audio To of both the loop containing channels to Sends Only.
Step 8
In this tutorial I will be using the computer keyboard for the MIDI input of Ableton Live. Please note that one might just as well take the hard way and use a MIDI controller. For optimal use of the functionality, use a MIDI controller of which the buttons have visual feedback.
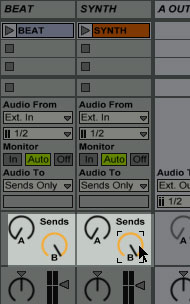
Open the Sends B dial on both Audio Channels to their maximum value.
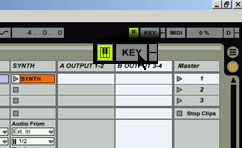
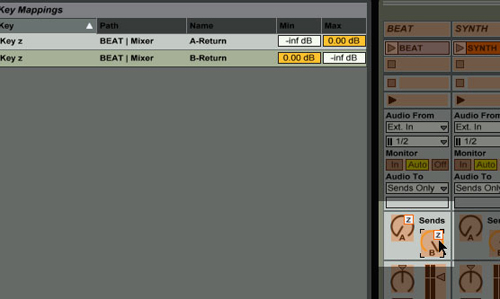
Press the KEY button in the right top op your arrangement in order to assign the Audio Track sends to a key on your keyboard.
Next, assign the keyboard’s key Z to both Sends on the first audio track (in this case BEAT). Do this by first clicking on a Sends dial, and then pressing Z on your keyboard.
Now, do the same for the second audio track (SYNTH), but use Key X instead of Key Z. Your automation settings should now look something like this:
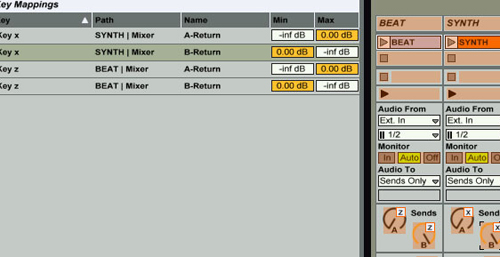
If everything seems right, press the KEY button in the right top of the screen again to exit keyboard assign mode.
Step 9
Put both audio tracks on play. Adjust the volume level of your external effect so that there’s no difference in the volume of the audio track when switching outputs (by pressing Key X or Key Z).
That’s it! By pressing the X or the Z Key, the respective tracks will either play through your external effect or through the main output on the press of a button, without any noticeable difference . You can insert as much tracks as you want, all you need to do is make sure you don’t run out of keys on the keyboard!